TurtleCraftyGirl

Sunday, December 11, 2011

Felt Birdies Christmas Ornament - Tutorial


I made these Felt Birdies ornaments for my friends and colleagues for Christmas. They were easy and fun to make.

Here is a quick tutorial:

Things you would need:
  • Felt in any color you prefer
  • Cotton thread in matching color
  • Needle
  • Scissors
Instructions:


Step 1: Fold the felt in half and cut the felt in the above shape of a bird.  You would need 2 similar shapes for front and back.


Step 2: You would need to to cut a felt of above 3 shapes: 1 wing shape, 3 small circles and 1 blank eye.


Step 3: Attach the round felts to the wing, as shown in the above picture.


Step 4: Attach the wing on one side of felt bird cut out. Also attach the eye on this side.


Step 5: Stitch the 2nd blank birdie felt to the one decorated using blanket stitch. Right when you are almost done, insert the foam or any padding to give birdie its shape.Then close the bird. 


Step 6: Now experiment with any color combinations you wish.


Merry Christmas & Happy Holidays.


Friday, November 18, 2011

RAWR: Dinosaur Birthday Party

I am so excited to write this post about my son's 3rd birthday party. It was so much fun to finally see all that I had worked on, in the last few months, coming together, and my son and his friends enjoying each and every moment of it.


First the Roaring invites. Decided to go with the silhouttes of Dinosaurs on it. This sort of set the color theme of the party: Green, Blue and Orange.


                                    The Birthday Boy. My sweet adorable baby, now a boy.


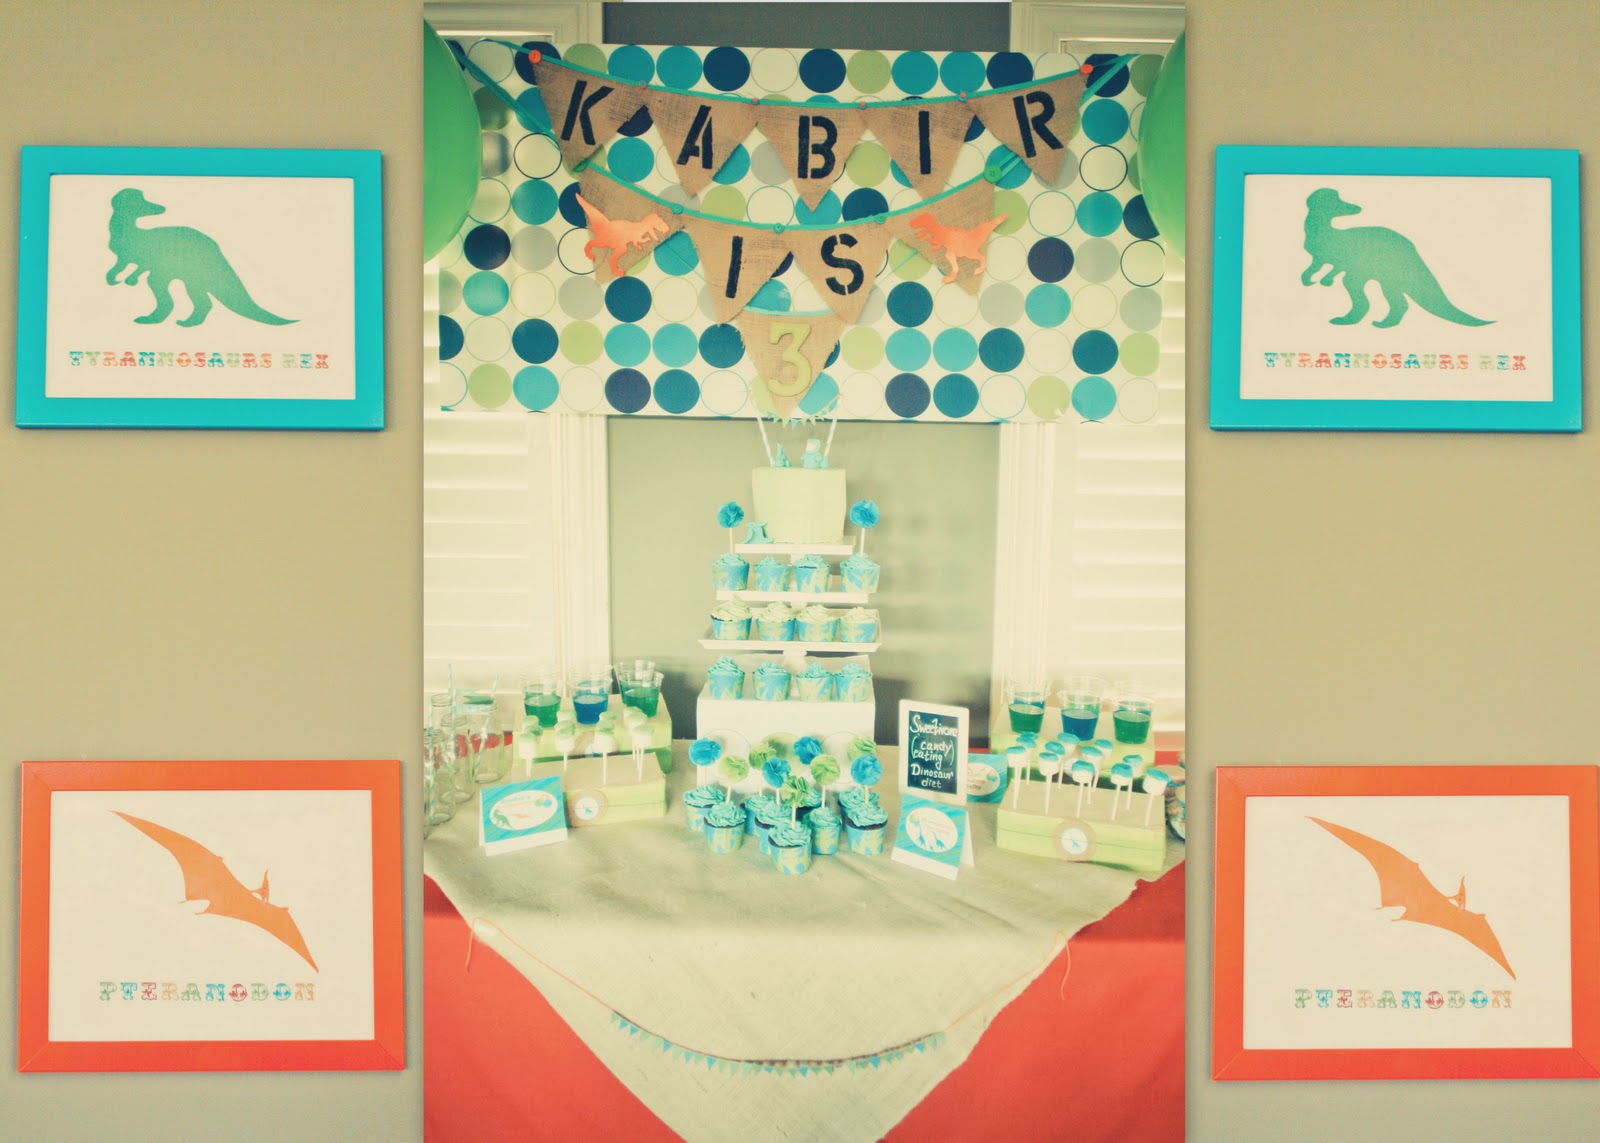
Here is the dessert table for the party. In the background is the burlap banner which I cut and handpainted with all my love for my little one. The banner is pinned on the backdrop that is made from foam and covered with a printed fabric. Would you believe me if I tell you that I used a shower curtain as my fabric!!!


I really wanted the big round balloons for the party. But what a trouble it was to get this inflated. My sister and I spent 2 hours before the party trying to find a place that could fill this up. 

Framed the prints of 4 Dinosaurs and hung these on both sides of the dessert table. 

I decided to take things simple with the cake this year, to reduce the last day stress. It was a Chocolate Devil cake with dinosaur toppers ready to roar. For the Trex dinosaur topper, I followed the tutorial here. For pterandon and stegosaurus, I used the pictures here to make the toppers. Added a cake banner made from printed paper.


For each kid, there were cupcakes with the bright tissue pom pom topper. The tutorial for topper can be found here.

The Jello in Green and Blue was kids one of the favourites. I was planning to add dino shaped gummys to it, which I had especially bought for this purpose, but gummys disappeared right when I needed. 


The marshmallows sprinkled in blue and green were super easy to make and I could prepare it couple of days in advance. It was as simple as dipping the marshmallow in melted white chocolate and then dipping it in the sugar sprinkles.


Candy floss(above): I got these mini candy bottles from Ikea and decorated with the Dinosaur labels. Added a burlap fabric with ribbon to decorate it.

Along with the printed food labels, I also added the signs to indicate if it was a Sweetivore Dino Diet or Carnivore/Herbivore Diet. These signs are made from photo frame(Ikea) with chalk paper in it.

Chocolate and Vanilla milk in glass milk bottles. Instead of buying the expensive milk bottles, I used the Starbucks coffee bottles. That meant my family had to drink lots of coffee in a short span of time :-)


Chocolate covered Oreos was another addition on the table. Used regular and mint oreos, dipped them in chocolate and added a swirl with the melted candy.


Popcorn cones were the first one to go. I had to refill each kid's cone. Looks like popcorn rates higher than the sweet stuff for toddlers. I made these popcorn cones from thick cardstock paper and decorated with tiny dinos and sparkles.


There were fruit kababs with chocolate fountain and sixlet jars as well on the candy table.

For the snacks table, there were lots of snacks most of which my sister made single handedly. The recipes of turkey rolls and potato salad bites can be found here

                        In the background is another birthday banner for the snack table.


Dinosaur RAWR from wooden alphabets painted and decorated with crepe paper flower.

The salad cup was my favourite. By the end of party, all were gone, so I guess parents won't hate me that much for all the sweet.


                                                                   Dinosaur Drinks


Dinosaur eggs(string balls) at the entrance. There is a tutorial on these eggs here


                'I wish I was a Dinosaur' pins for each kid as they came in. 


Table setting
Each kid got his/her own paper dinosaur. This was the most tedious project. My hands were stiff for days with all the cutting and folding :-)


           Activity table
Surprisingly, kids spent a lot of time here, and made amazing art work.


                                                                 Goodie bags
This was my favourite project I undertook for this party - a personalised goodie bag for each kid. Here is the tutorial on it.


Party Hats
I bought ready made hats from walmart and decorated them with printed paper and pom poms. Kabir chose and stuck the pom poms on each hat for his friends.


   Dinosaur name printables
Each kid got one before they left.


                                     Now the games. This was part I liked the most in the party.

                                                                                Dino Dig


I filled Kabir's toy bins with play sand and lots of dinosaur skeletons. Got few shovels and stage was set for a fun Dino Dig.


                                                                            Pinata


                                                                Dinosaur Egg Hunt
Kabir and I made these eggs from soil flour salt mixture, with a tiny dinosaur baby hiding in between the egg.  Kids had as much fun breaking each egg to find these dinos, as they had hunting for these. I wish there was a better picture of the eggs. Here is the tutorial I followed for the eggs.


                                                                  Erupting Volcano
Made this volcano from flour/salt/water mixture over a plastic bowls. The topmost bowl had baking soda. Each kid got a chance to pour magic mixture(vinegar) in the volcano and watch it erupt.


                                                                       Photo Booth 
I got some props for the photo booth. There was dino masks, dino noses, dino tail for the kids to use.


This is my favourite picture. All the kids together(almost)..some were still inside muching on the sweets.


                      And this is what I get for throwing this party. A big Dino kiss. Isn't it worth it.


Other Details:

Invites by TheGreengrassgrows. Printed at catprint.com
Cupcake liners and straw slip printables from TheCelebrationShoppe.
Birthday boy Dinosaur shirt from DressMe
Birthday boy Dinosaur Hat from StellandLivi. I added the pom pom and frill for more cuteness.
Paper Dinosaur Kirigami printables from EasyCutPopUp.
Striped Straws from Isakayboutique
Dinosaur Pin Buttond from Wacky Buttons
Photography by Mickie from Winters Photography.
Everything else : made with LOVE by Kabir's Mom


Sunday, October 30, 2011

Dinosaur Egg String Balls


This is one of the many projects I made for Kabir's Dinosaur Birthday Party. I am still waiting on the birthday pictures, so I am going to use this time to post the projects I made. 

This is very similar to the hemp lamp I had made here, but with some important differences. For the egg shape, I used a balloon instead of a ball. And cotton/acrylic yarn instead of hemp string. You can color the hemp string instead as well. But these 2 replacements introduced new problems. As balloon is thin, it sticks quite strongly with the yarn, which makes the yarn more susceptible to cave in once deflated, leaving the ball shapeless. After trying various options, I figured that the balloon needed to be coated with something to avoid yarn from sticking too much with balloon. From what I read online from others experiences, some people tried using Vaseline, but it made the balloon surface very slippery. So, putting the string on makes it tougher.  Finally, I decided to use wax instead, and it worked like a charm. Below is a small tutorial on what worked for me:

What you need:
  • Acrylic/Cotton yarn
  • Small size latex balloon
  • Dry wax(I used my dry wax for hair)
  • Fork or needle to deflate the balloon
  • Clear gel tacky glue or any fast drying glue


1) Blow the balloon in the shape of an egg.

2) Coat it with wax: very important step. Try not to leave any spot. The green ball below is an example of what happens if this step is skipped. Once the balloon is deflated, the yarn caves in, and the ball is left shapeless and loose.


3) Pour glue in a bowl. Dip the fingers in the bowl and run it through a small section of string and then wrap it around the ball.

4) Let it dry over night, for around 12 hours. The acrylic wool takes less time to dry than hemp string. 

5) Deflate the balloon with a fork or needle. This was Kabir's favourite part(or should I say, the only part where he was involved in this project).

There was an egg waiting for him everyday in the morning (for almost a week) that he would deflate. I think he enjoyed deflating the ones that caved in more than the others.

The blue and orange string balls were made with the additional step 2: of coating the balloon surface with wax, and I love the output.


You can leave a place at the top (just like in hemp lamp), if you want to use it as a lamp.

Enjoy!
 

Tuesday, October 11, 2011

Dinosaur Tote Bag Tutorial


October, my favorite month of the year is here, which also means my son's birthday is around the corner. Preparations are in full swing and Kabir is participating at every step, which makes it all the more enjoyable. There was no confusion on the theme of the party. Kabir made it clear a while back that he wanted a Dinosaur Birthday Party. So that’s what he is going to get.

I don’t want to ruin the fun by posting everything before the party, but I have decided to share a little here and there.

Birthday invites are already in the post, and I love how the invites have turned out.


The favourite part of the birthday for the kids is normally the goodie bag. I knew I wanted something earthy and natural looking, and in a big size so I could fit in all the good stuff for the little ones. I looked at the muslin cloth drawstring bags on etsy, and I loved them. But the biggest size they came in was 8*10. Anything bigger than that was too expensive. Plus, I thought it would be easier for kids if they had a tote bag with a handle vs drawstring. So after much thinking, I decided to make my own.

What we are making: Tote bag of size: 11"wide by 26"high with a TRex Dinosaur painted on it along with kids name stamped on it.

Stuff you need:
1) Muslin cloth - cut to the size you want
2) Sewing machine or needle/thread if doing by hand
3) Scissors

For Decoration
1) Stencils (you can make your own)
2) Acrylic or fabric paint
3) Sponge brush
4) Alphabet stamps

You can create your own stencil by printing the image you want on paper. Cut it out, and trace it on a card board. Cut the image on the cardboard keeping the outside intact. I started with making one stencil, until I saw this amazing deal for Dinosaur stencil on amazon.

Step 1 : Cut the muslin cloth of desired size.  I cut it 11"wide by 26"high for a bag of size 10"wide by 12"high.


Step 2 : Decorate the front side before sewing. You can use the acrylic paint as is, or add a textile medium like GAC 900  to it.
Place the dino stencil in the center, and put some tapes on the edges to avoid it from moving. Keep a cardboard behind the fabric to avoid staining the surface below with paint.


Step 3: Using the sponge brush and acrylic paint, paint the part in the stencil. What worked the best for me was to start in the middle with the big sponge brush, and do the edges with a small paint brush. For the edges, you can also pat your brush down, in up and down motion, instead of horizontal strokes. This prevents the paint from leaking from under the stencil.

Step 4: Take off the stencil gently, and let it dry.

Step 5: Using rubber stamps, add the name at the bottom of image, on the muslin cloth.


Step 6: Make a strap/handle for the bag


Pic a: Cut a strip of fabric depending on how broad and long you want. I cut of size 2 " by 15". Fold the fabric length wise and sew it from 3 sides. Keep it open from one small side as you would need it to turn it. Here you can see the part under scissors is open.

Pic b and c: Using a knitting needle, stick the needle at the short edge which is closed, and pull the fabric down as shown in pic.

Pic d: Pull the part of fabric which has turned over and straighten the strap. Iron it.

Step 7: Sew the bag together. Fold one inch of the top edge to the inside of the bag and pin in place. At this point, attach the handles of bag. Place the straps an even distance from the side seams, and pin it. Stitch the edge in place stitching as close to the edge as possible.


Step 8: Sew a square, and a cross at the end of the strap to attach it to the bag securely.


Step 9: Fold the length of the fabric in half with the right sides together. Using a 1/2" seam allowance, sew both side seams.


Step 10: Turn the bag right side out and iron it.


Ta Da.. bag is ready. This tote bag can be used as a goodie bag, gift bag or just a personalised everyday bag for your little one.

1 done 20 more to go :-)

Here is the link to rest of the details from the Dinosaur Birthday party.

Happy Sewing!
Related Posts Plugin for WordPress, Blogger...